
Blemishes, creases, minor tears, corner wear, and other common forms of damage seen in older photos can often be quickly "repaired" of "cleaned" in a scan by using digital image software such as Photoshop Elements.
Many people are very sentimental about originals. Although I believe we should protect originals as best we can, the memory reflected in the image is normally what is most important. By scanning and then repairing an image, we have an improved image that can be more easily shared, and is now digitally repaired and preserved.
Photoshop Elements or the equivalent is very powerful software. Unless you are quite serious about photography, you are unlikely to use more than a handful of "tools" made available. Photoshop Elements can be acquired for less than $100, and once you have become comfortable with three or four tools in the "toolbox", you can quickly and confidently cleanup and repair older images.
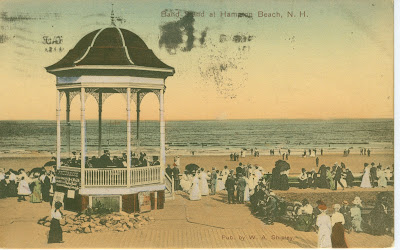
Below is a great vintage postcard image of Hampton Beach, NH postmarked in 1916. Wear and tear is evident, and the post office was clearly not careful with its postmarking ink.
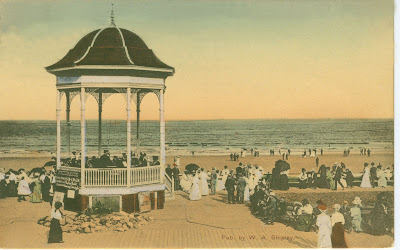
Below is the "cleaned up" version of a scan of the image that used only two tools in the Photoshop Elements toolbox and took less than 5 minutes to complete. The tools used were the "Zoom" tool and the "Clone Stamp" tool.
I will briefly describe how the "Zoom" and "Clone Stamp" tools were used to "clean" this digital image.
1) The vintage postcard, which could have been a vintage photo, was "imported" into the edit area of photoshop elements by using file > import, and selecting my 3 in 1 printer as the source for the scan. I selected a 600 ppi resolution as I may want to print an enlargement one day, and this will provide plenty of flexibility.
2) Among the tools in the toolbox, the "zoom" tool icon is shaped like a magnifying glass. Clicking on this tool and then the choice to increase size, I can magnify the onscreen image to assess needed repairs, and make the repairs on a magnified image. I can easily increase or decrease magnification to see overall progress.
3) I then selected the "Clone Stamp" tool to make repairs to areas needing edits. The basic idea is to take a sample of an area in the image that is satisfactory and then to stamp a clone image of the sample onto the area in need of repair. The clone stamp tool provides a choice of many sizes and densities of samples with a windows right click.
4) In this example, most of the damage in the postcard image was found in the pinkish and blue areas of the sky. Using a windows version of elements, I would simply sample a pinkish area of the sky by using Alt Click, and then Click in the pinkish area to be repaired. Likewise, I would sample a blue area of the sky to "clone" that color onto a blue area in need of repair. This takes a bit of practice. However, by the second or third picture or image, you will be amazed at how easy the tool is to use, and how effective the "clone stamp" tool is in making smoothly transitioning repairs. Save the original scan before you begin the repair. If you make a mistake, you still have the original scan to open. You can then experiment confidently until you have the technique mastered.
To read more about features available, see the product description for Adobe Photoshop Elements 8. For more suggestions on scanning, printing, and other family photo topics, visit LocalArchiver.com.


No comments:
Post a Comment