Friday, May 28, 2010

Online Albums - A Word of Caution

Many families post digital images to online albums, including the sites of major online printers. These free and easy to use online albums can be very helpful in sharing images with friends and extended families. However, it is important not to rely solely on these free online albums as your digital image library backup.

The fine print in many online album service agreements typically allows the provider to re-size and/or eliminate images, at their discretion. With the declining cost of storage, this is unlikely to become a problem. However, these online album providers can be subject to human, software, and hardware failures, and your family photos are simply too important to rely upon someone else as your primary backup.

As prices and sizes of memory formats, such as CDs, DVDs, and memory sticks, continue to decline, there are no good excuses for not having the bulk of your digital images duplicated and stored in a bank safe deposit box or other off premise location. It is just too easy, quick, and inexpensive to not make the effort to backup some of your most prized family possessions.

For more information on organizing, preserving, and sharing family photos, visit LocalArchiver.com.

Wednesday, May 12, 2010

Why Family Photos Are Important

Family photos and documents are often among a family's most prized possessions because they provide a tangible image link to the past.

At some point in our lives, most of us will come to realize that our lives are more closely connected to generations past, present, and future than we previously appreciated. Connections to our past are important to developing and maintaining a sense of place, a sense of personal and local identity, and often add to our individual sense of purpose and belonging.

Much discussion is currently centered on “social networking”. The family remains our most important and core social network. Shared family experiences, memories, heritage, and often values and interests are reflected in family photo collections and provide a sense of connectedness as well.

A well organized and effectively shared photo collection can promote a clearer understanding of how our family ancestors influenced our thinking, and provide reminders of our personal history and development. A properly organized photo collection allows the next generation to better appreciate these important photo reflections of the past, and can help them to understand their heritage as well.

It was not long ago that most family photos were limited to professional studio portraits. As photography became more affordable and mainstream in the last century, families have routinely captured more images of their family history. Digital technology has now made image transfer and sharing much easier, and online databases are making genealogy research more fruitful than ever before. With the evolution of these tools, developing family histories and coloring that history with photo images has become a growing interest of many families.

Preserving our sense of place and family history is at the heart of why it is important to both preserve and share family photo images. Special family photos and documents simply help us to remember and better understand the uniqueness of our families and our individual journeys.

For more information on organizing, preserving, and sharing of family photos, visit LocalArchiver.com. The above blog is an excerpt from a book being assembled for publication this fall and based on articles at LocalArchiver.com.

Tuesday, April 13, 2010

Older Family Photo Albums May Create Problems

Take a good look at your existing albums, and look for signs of photo discoloring and fading. The problem may be in the materials that were used to make the albums.

Many albums sold in the past were not made of archival materials and have damaged many older pictures. If you see signs of deterioration or have concerns, seriously consider upgrading to archival quality albums or scanning the album contents to make printed photo books.

Your albums likely contain the best of your photos, so the quality of the storage materials surrounding your very best photos should not be taken lightly.

The many older albums sold with black paper pages are often very acidic, and the laminated look "magnetic" albums widely available in the past are notoriously bad for photos. The picture above is an example of a bad magnetic album where air coming in on the edges has apparently fueled a chemical reaction with something used to manufacture the album. If the photos in such non-archival albums have not already been damaged beyond hope, it may be worth the effort to try to scan the pages or simply remove photos in these albums.

For discussion of what to look for in archival materials, see the article on Storing Original Photos at LocalArchiver.com. For replacement album solutions, visit the Photo Albums and Scrapbooks area at Blick Art Materials.

Tuesday, March 30, 2010

Make Your 35mm Slides A Part of The Family Photo Collection

In addition to photo prints and newer digital photos, many families have a bunch of 35mm slides that seldom come out of the closet. My family recently tackled the project of culling our slides and sending them off to be scanned in order to add them to the rest of the consolidated digital photo collection. Here are some observations and suggestions.

1) To be most useful for printing, scans of 35mm slides require much higher scan resolution than prints, as the image being scanned is smaller. Therefore, home scanning is more challenging and time consuming. For this reason, it is a relatively easy decision to turn to professional scanning for 35mm slides.

2) Slide scans are not cheap. Therefore, you can save a meaningful amount by waiting for a sale on these services, and by organizing the slides for scanning in order to take advantage of a sale when it comes along.

3) Professional scanning services like ScanDigital
and ScanCafe will typically place a short time frame on discounts, often a requirement to send the slides in the next two or three days. Therefore, you should have your slide collection culled and be in a position to send only those slides you really want to have scanned on short notice.

4) Many older 35mm slides are likely to show severe fading already. Over the years we had slides developed by several labs, many of which are no longer with us. It is probably a matter of different developing approaches that created a marked difference in longevity of the images. Some 25 - 40 year old slides look like they were developed yesterday, while others are faded beyond recognition. The older ones had suffered most notably.

5) The image above shows the roughly 600 slides we organized to be scanned. We pulled out the old slide projector and spent about an hour culling the slides that were not worth the price of a scan. This was easier than one might expect. The result was quick agreement to toss roughly two thirds (loose slides) and scan the remaining third (boxed slides). At a discounted sale scan price of roughly 50 cents a scan, this saved about $200. For roughly $100, we now have our favorite 200 slides consolidated with our other digital images.

6) My suggestion would be to carve out the time to preview and cull your slides. Then use these links at ScanDigital
and ScanCafe to register. You will then receive alerts relative to specials these professional scanners offer from time to time.

Anyone interested in a cheap GAF Anscomatic 660 slide projector with an extra bulb??

For a discussion of other scanning considerations, visit the Scanning Section at LocalArchiver.com.

Monday, March 22, 2010

Quick and Easy Photo Repair With Photoshop Elements

I was recently asked about cleaning old photos and whether spray cleaners can be used safely. I have not used these products and I suspect that improper usage could cause some real problems. Therefore, I suggested that cleaning of older original prints should be left to professionals, and suggested an alternative digital approach to "cleaning".

Blemishes, creases, minor tears, corner wear, and other common forms of damage seen in older photos can often be quickly "repaired" of "cleaned" in a scan by using digital image software such as Photoshop Elements.

Many people are very sentimental about originals. Although I believe we should protect originals as best we can, the memory reflected in the image is normally what is most important. By scanning and then repairing an image, we have an improved image that can be more easily shared, and is now digitally repaired and preserved.

Photoshop Elements or the equivalent is very powerful software. Unless you are quite serious about photography, you are unlikely to use more than a handful of "tools" made available. Photoshop Elements can be acquired for less than $100, and once you have become comfortable with three or four tools in the "toolbox", you can quickly and confidently cleanup and repair older images.

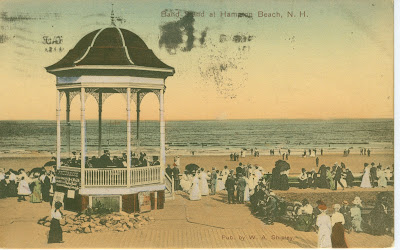
Below is a great vintage postcard image of Hampton Beach, NH postmarked in 1916. Wear and tear is evident, and the post office was clearly not careful with its postmarking ink.

Below is the "cleaned up" version of a scan of the image that used only two tools in the Photoshop Elements toolbox and took less than 5 minutes to complete. The tools used were the "Zoom" tool and the "Clone Stamp" tool.
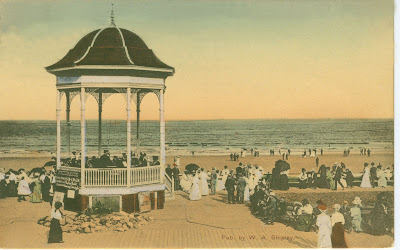


I will briefly describe how the "Zoom" and "Clone Stamp" tools were used to "clean" this digital image.

1) The vintage postcard, which could have been a vintage photo, was "imported" into the edit area of photoshop elements by using file > import, and selecting my 3 in 1 printer as the source for the scan. I selected a 600 ppi resolution as I may want to print an enlargement one day, and this will provide plenty of flexibility.

2) Among the tools in the toolbox, the "zoom" tool icon is shaped like a magnifying glass. Clicking on this tool and then the choice to increase size, I can magnify the onscreen image to assess needed repairs, and make the repairs on a magnified image. I can easily increase or decrease magnification to see overall progress.

3) I then selected the "Clone Stamp" tool to make repairs to areas needing edits. The basic idea is to take a sample of an area in the image that is satisfactory and then to stamp a clone image of the sample onto the area in need of repair. The clone stamp tool provides a choice of many sizes and densities of samples with a windows right click.

4) In this example, most of the damage in the postcard image was found in the pinkish and blue areas of the sky. Using a windows version of elements, I would simply sample a pinkish area of the sky by using Alt Click, and then Click in the pinkish area to be repaired. Likewise, I would sample a blue area of the sky to "clone" that color onto a blue area in need of repair. This takes a bit of practice. However, by the second or third picture or image, you will be amazed at how easy the tool is to use, and how effective the "clone stamp" tool is in making smoothly transitioning repairs. Save the original scan before you begin the repair. If you make a mistake, you still have the original scan to open. You can then experiment confidently until you have the technique mastered.

To read more about features available, see the product description for Adobe Photoshop Elements 8. For more suggestions on scanning, printing, and other family photo topics, visit LocalArchiver.com.

Wednesday, March 10, 2010

Family Photos - Some Organizing Basics

Family photos are not ordinary clutter as they are often a family's most treasured and enduring possessions. However, the steps to getting a family photo collection organized are very similar to steps suggested by professional home organizers to address ordinary clutter throughout the home.

Step 1) Inventory/Assess - Pulling out your photos, slides, albums, scrapbooks, and related items allows you to size the project and can provide some momentum to get started. This may also help you to decide which part of your family image collection to tackle first. Perhaps you decide to set aside a project area to work with just prints and albums, and then put the rest back in the closet for another day.

Step 2) Sort and Cull - The initial sort should be to decide what should be kept and what can be tossed. It can be as difficult to downsize your family photo collection as it is to get rid of clothes that no longer fit in your closet. It is likely that your collection contains some photos that add little value to your collection, and probably should have been eliminated when you had the prints developed or downloaded. Among multiple shots of the same events or subject, there are often just a few true "keepers". Sorting and culling will make the next steps more manageable, and allow you to focus your activities on the best images in your collection. This will also reduce the expense associated with storing, displaying, and sharing your images.

Step 3) Organize - The goal of organizing prints, slides, digital image files, and other image formats is similar in that the ultimate objective is to be able to easily locate an image when you go looking for it. This requires some thought about categories and a filing system. Dates, subjects, events, places, and family are some of the common organization categories. At one extreme, the organization may be as simple as prints sorted by decades. At the other extreme, a consolidated and properly captioned digital image library provides the ability to search and sort images by keywords reflecting who, what, where, when, and why.

Step 4) Contain and Store - Archival quality albums, sleeves, and boxes will help to extend the useful life of originals and protect them from harmful environmental factors such as dust, light, and accelerated chemical related deterioration. Digital images can be stored in a variety of ways and distributed more widely to extended family. When storing, one should think about the best way to backup the collection. If you have a digital library, duplicate files can be shared with other family members and placed in a safe deposit box. If you have important one-of-a-kind prints with no duplicates, consider having a few of the best prints scanned and keep the digital files at a second location and share them with extended family.

Step 5) Keep It Up - Once you are organized, add new images to the organization system you have developed. It is a good habit to cull low interest/value images as you see them, and to simply apply your organization scheme to the best ones.

For more thoughts on organizing family photo collections and to find Tips for Sorting and Culling, visit the Organizing Section at LocalArchiver.com. For a discussion of scanning considerations, visit the Scanning Section, and for storage and containment supplies, visit the Preservation Resources Section.

Friday, March 5, 2010

Color Photos and Fading

Did you know that many dyes used in color photos as recently as 20 to 30 years ago were relatively unstable, and that color photography became mainstream about 50 years ago?

If you have some older color photos, such as the early '60s photo above, you will often notice that some are more faded than others, even when of the same era.

Depending upon the materials used to create the prints, many earlier color prints are quite likely to at least begin to show noticeable fading, even when they have been properly stored.

Therefore, if you want to preserve these color print images as best you can before more visible fading, you might want to consider scanning them. For a discussion of scanning considerations and options, see the Scanning section at LocalArchiver.com.